How to Diamond Painting - Instruction Manual
Once you’ve grasped all the relevant knowledge and norms pertaining to the art that is diamond painting, you can now move on to learn the most imperative step in this journey. Not everyone knows how to paint by diamonds the most extravagant and exquisite manner, so our experts have compiled a series of steps that will serve as a prolific instruction manual that will serve as a complete guide to diamond painting and produce a masterpiece;
Bestir oneself with the Canvas:
The journey to come up with a diamond painting masterpiece is not an easy feat at all, if you’re not well equipped with the right tools. Thus it’s a no brainer that the very first step here is to bestir oneself with the canvas. This step serves as the foundation for other technical steps to follow, so we’ll walk you through all of it in detail;
Opting for the best Kit: Primarily, utilizing the money in your wallet in the most prolific and cost-effective method is the key to purchase the right diamond painting kit for yourself. This significant step has the potential to either make or break your experience so here’s our expert recommendation for you; the individuals who label themselves as pros can acquire their larger kits from any craft store whereas, the people who have recently adopted this hobby of diamond painting should opt for the smaller sized kits as they are easy to complete and they are known to build interest. In order to attain the perfect value for your bucks always opt for a kit packed with a printed canvas, bedazzling diamonds, a cute tray, a settler tool and a gel/wax sachet. (Easy isn’t it?) 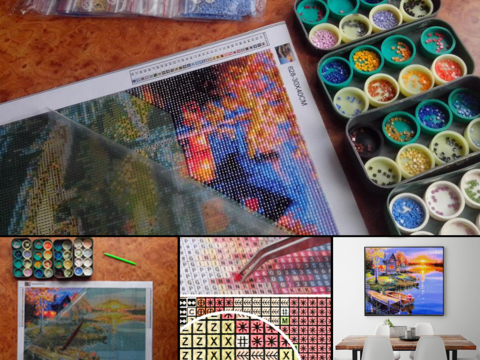
Understanding the Canvas: Secondly, it all comes down to having a clear and complete understanding of the printed canvas. Basically a canvas is an array of small squared boxes which have their very own colored, numerical, symbolic or alphabetic labels. Working with labels gives us the leverage to falter as little as possible. The chart alongside the labels ensures that we don’t get lost in this entire journey. There’s no denying the fact that these labels, are easier to follow, comprehend and execute.
The Soothing Smoothing: Thirdly, smoothing out the canvas is the next step. Once you’ve unfolded the canvas, there now lies a beautiful spectacle in front of your eyes that is ready for us to dig in but the edges aren’t smooth yet. To smooth out the canvas entirely, the best practice is to tape it down to any particular flat and smooth surface. Using masking tape to prevent the edges of the canvas rolling in and hindering your process is the key here. We know that this process can cause some headaches too but if you strictly follow our instructions, you won’t have any problems whatsoever and you can now proceed to the next steps in the most prolific method.
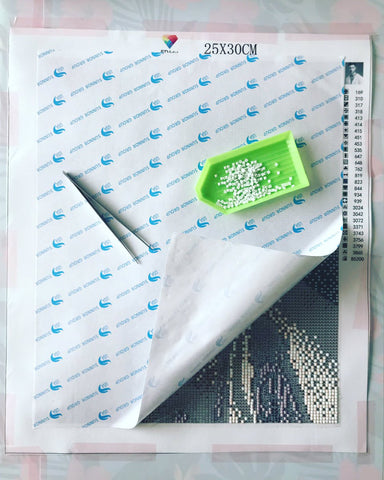
Image is taken from Trendy Diamond Painting
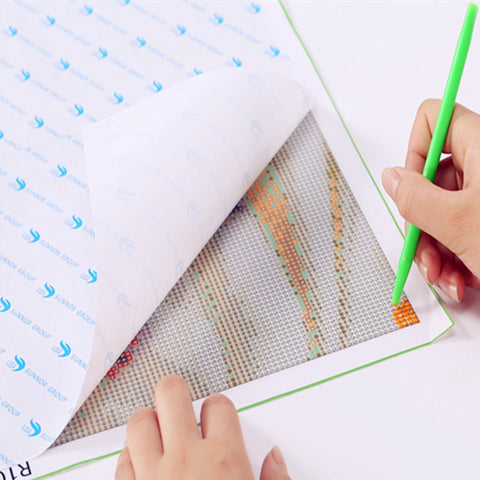
Peel as you Proceed: Moving on, this particular next step centers around peeling the plastic. Since you must be aware by now that there’s a plastic covering over the canvas, we’ll now tell you what you have to do about it. Basically, you have to peel off a part of it before you begin on the canvas. The best practice is to peel off a little chunk (about 1 inches) and commencing your painting until that portion is complete. Never peel off the entire plastic covering or else the canvas loses its only protective covering.
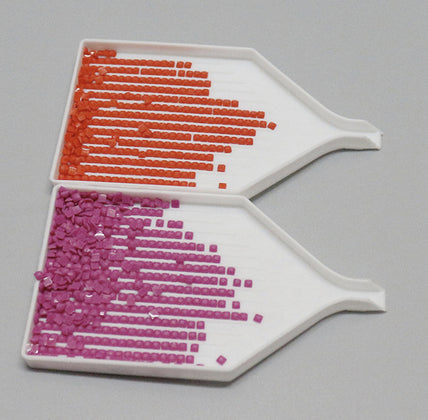
Sorting the diamonds: Next, we have now arrived at the final stage of bestirring yourself with the canvas. Here, we intend to pour the diamonds onto their respective trays in order to ensure perfect segregation. It works wonders if you proceed using a small amount at first. Consulting the canvas lying in front of you, you can now move forward to grab onto the respective diamond’s bag. All you have to do here is to empty that bag in the tray and that’s how you bestir yourself with the canvas prolifically. You can let your very own will and preferences come into play here and proceed accordingly.
Inserting the Diamonds
Inserting these diamonds in their respective lay-area is the next step in this diamond painting journey. Every diamond has its very own mission to hold its own fort and bedazzle the eyes pondering over them. This tedious but fun part can be easily mastered if you follow our expert instructions;
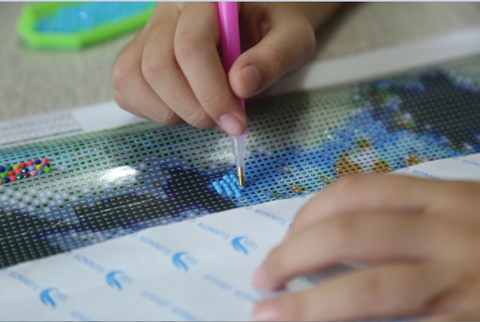
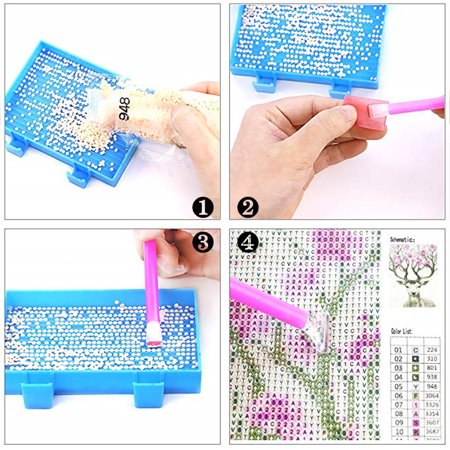
Getting the hang of your settling tool: To begin with, you need to use the settling tool which basically resembles a pen. Gripping that settler firmly between your index finger and your thumb is important. Next you have to open that sachet of gel and slightly dip the narrow end of this settler into that. Continue this effortless task by picking up one diamond at a time. The most recent developments here are that wide angled settler tools are available in the market as well that can help you pick up multiple diamonds together. (What a time to be alive right?)
Picking up diamonds: Next, once you’ve mastered the art of holding your settling tool. Now’s the time to introduce you to the dynamics of the most essential part in this entire process i.e. picking up the all-important diamonds. Our experts believe that being gentle is the key here. Using the settler with the right amount of wax, the key is to gently tap over the diamond and within no time it will cling. Lift the settler to check if it lifts the diamond. If it does, you can now progress to the following step.
Plying the diamonds: Moving on, now’s the time to lay the diamonds onto its respective square. Remember, the gentler you’ll be in this entire process, it’ll be more rewarding for you. Never push a diamond with force because the diamonds are designed to fit perfectly into place. If it’s not, you’re certainly doing something wrong.
Work your way: In addition to all that, you are now ready to proceed until your desired area is filled with the diamond lot. It’s a common practice to work your way through one color at a time and that’s how you can rev things up.
The prolific completion: Subsequently, as you complete section by section, we now allow you to peel off the plastic covering and commence with inserting the diamonds. Don’t forget to hold onto our tip of peeling the plastic and thus inserting diamonds in a relatively smaller area.
Racing Towards the finish line
Once you’ve embarked on this gratifying journey to produce a masterpiece, you’ll notice that each step counts. Each step is equally important but concluding in style is one of the most important step. Don’t worry, we’ve got you covered here as well as we’ll boost your racing shoes to reach your destination in the most exquisite manner;
Covering the canvas: In order to reach the finish line and that too in style, the next step involves covering the canvas. The same plastic sheet can be used for this matter or any piece of paper can do the trick here.
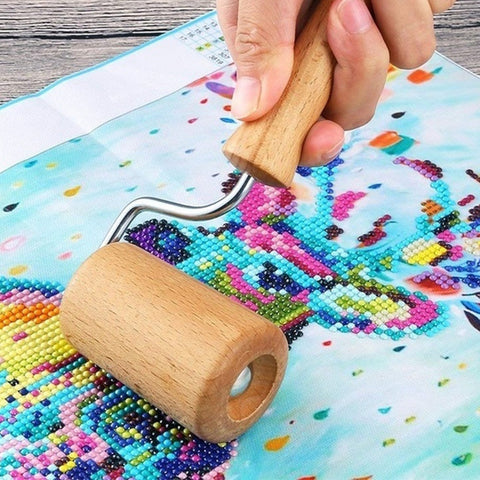
Settling the diamonds: Next, in order to ensure stability throughout the core of this painting, any sort of rolling pins, can, jars, rollers or even your bare hands can be handy enough to settle the loose diamonds.
Bonding the diamonds: Next, in order to have a smooth bonding throughout the painting, stacking a substantial amount of load, for a substantial amount of time (4 to 6 hours at least) over the canvas can be really helpful.
The penultimate step: After the stacking part is complete, remove the load, then remove the plastic covering and lastly remove the tapes as well.
Frame the fame: The final step is to frame the canvas delicately. This step ensures that you get a fancier look and your diamond painting stands out in all its glory.
To become the next big diamond painting sensation, all you have to do is internalize and follow this step by step expert instruction manual. So hurry up, and channel all your positive energies to the newest addiction i.e. Diamond art.

